To make bleed and crop marks in Photoshop, go to “File” and select “New.” Enter the desired dimensions, add the bleed value under “Bleed,” and choose the appropriate measurement unit.
Click “OK” to create the document with bleed and crop marks. When preparing a design for printing, it is essential to include bleed and crop marks to ensure accurate trimming and prevent white edges. Bleed is an extension of the design that extends beyond the edge of the page, allowing room for error during cutting.
Crop marks indicate where to trim the printed piece accurately. In Photoshop, creating bleed and crop marks is a simple process that ensures your design is print-ready. By following the above steps, you can easily add bleed and crop marks to your Photoshop document for a professional and accurate print result.
Photoshop Basics: Understanding Bleed And Crop Marks
Bleed and crop marks are essential elements in professional design, ensuring a flawless finished product. Bleed marks refer to the extended areas outside the page where elements can bleed off. Crop marks indicate the precise trimming lines for the final print size.
By incorporating bleed and crop marks, you avoid any white edges or cut-offs, guaranteeing a polished appearance. Professional designers understand the significance of these marks, as they prevent any unwanted gaps or inconsistencies between design and print. They enable a seamless integration of colors and images across the entire page, enhancing the overall visual experience.
To create bleed and crop marks in Photoshop, access the “Print” dialog box and enable the “Marks and Bleeds” option. Setting appropriate values for bleed and choosing the desired style for the crop marks will ensure accuracy in your final design.
Setting Up A New Document In Photoshop
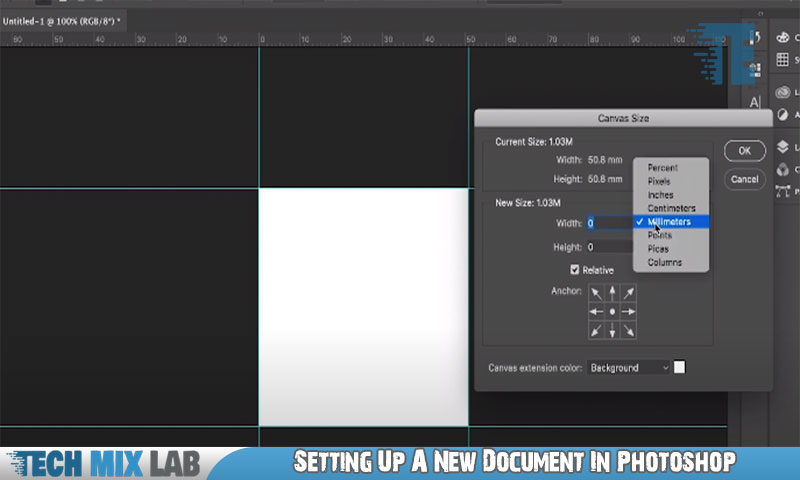
Setting up a new document in Photoshop involves choosing the correct size and resolution. Understanding the different color modes is also essential.
Creating Bleed Marks In Photoshop
Bleed marks and crop marks are essential in Photoshop for professional printing. To add a bleed area, go to “Image” and select “Canvas Size. ” Increase the width and height by the desired bleed size. Next, set up bleed guides to ensure accurate printing.
Go to “View” and choose “New Guide. ” Enter a value equal to the bleed area and repeat for all sides. This will create guides that indicate where to extend your design for printing. By including bleed marks, you prevent any white edges from appearing on the final printed product.
Crop marks can also be added to indicate where the final piece should be trimmed. Overall, by following these steps, you can optimize your designs for professional printing in Photoshop.
Applying Crop Marks In Photoshop
Applying crop marks in Photoshop is a crucial step to indicate the final document size. These marks help in achieving accurate trimming during the printing process. To add crop marks, first select the “Crop Tool” from the toolbar. Then, click and drag over the canvas to create a selection around your design.
Next, go to the “Image” menu and choose “Canvas Size. ” Here, you can customize the crop mark style and position by adjusting the “Anchor” and “Canvas Extension Color” options. You can also set the “Width” and “Height” values to match your desired document size.
Once you are satisfied with the settings, click “OK” to apply the crop marks. This simple process will ensure that your designs are properly trimmed and ready for printing.
Useful Tools For Creating Professional Bleed And Crop Marks
Create professional bleed and crop marks in Photoshop with ease using useful tools. The ruler tool allows for precise measurements, ensuring accuracy. Additionally, alignment tools guarantee proper positioning. Master these techniques for flawless designs.
Troubleshooting Common Issues With Bleed And Crop Marks
Troubleshooting common issues with bleed and crop marks can be a challenge. One issue often encountered is uneven bleed areas. To fix this problem, you can carefully review your design to ensure that the bleed extends evenly on all sides.
Another common issue is incorrect crop mark placement. To address this, double-check your settings and make sure your crop marks are positioned correctly. Remember to align them with the edges of your design to avoid any misalignment. By following these steps, you can overcome these common issues and create Photoshop documents with accurate bleed and crop marks.
Mastering this skill is essential for producing professional and print-ready designs. So, take your time, be meticulous, and produce stunning designs with confidence!
Professional Tips For Designing With Bleed And Crop Marks
Designing with bleed in mind is essential for seamless printing. Bleed refers to the area surrounding a printed document that extends beyond the trim edge. By creating designs with an intentional bleed, you ensure that there are no white borders or gaps after printing.
Crop marks, on the other hand, serve as visual guides for accurate trimming. They indicate the precise areas where the document should be cut. By incorporating crop marks into your design, you can ensure that important elements are not accidentally cut off.
To make bleed and crop marks in Photoshop, you can simply adjust the canvas size to include the desired bleed and add crop marks using the line tool. Remember to communicate with your printing service provider to determine the specific bleed and trim requirements for your project.
With these professional tips, you can confidently design with bleed and crop marks to achieve optimal printing results.
Finalizing The Design With Bleed And Crop Marks
Bleed and crop marks are important elements when finalizing your design for printing. These marks ensure that your design extends beyond the edge of the page, avoiding any unwanted white borders. To prepare your file for printing with bleed and crop marks, start by adjusting the canvas size to include the bleed area.
Typically, a bleed of 0.125 inches is recommended. Next, make sure that all important elements, such as text and images, stay within the safe area, well inside the crop marks. Once your design is ready, exporting it with bleed and crop marks is crucial.
In Photoshop, you can easily do this by selecting the “Marks and Bleeds” option in the “Save As” menu. This will include all necessary marks when saving your file for printing. Remember to double-check your design to eliminate any potential issues before sending it off for printing.
Recommended Resources For Further Learning
Are you looking to master the art of creating bleed and crop marks in Photoshop? Look no further! There are plenty of resources available to help you on your journey. Books such as “Photoshop for Beginners” and “Advanced Techniques in Photoshop” are great starting points.
If you prefer tutorials, websites like Photoshop Tutorials and Adobe’s official website offer step-by-step guides. For a more immersive learning experience, consider online courses such as “Photoshop Mastery” or “Mastering Bleed and Crop Marks in Photoshop. ” These courses provide in-depth lessons taught by industry professionals.
By investing in these recommended resources, you’ll gain the knowledge and skills necessary to create professional designs with bleed and crop marks like a pro. Start your learning journey today!
FAQ
How Do You Add Bleed And Crop Marks In Photoshop?
To add bleed and crop marks in Photoshop, follow these steps: 1. Open your document and select the Crop Tool (C). 2. In the Options bar, enter the desired bleed values in the Width and Height fields. 3. Check the Delete Cropped Pixels option to ensure any excess is permanently removed.
How Do You Add Bleed And Crop Marks?
To add bleed and crop marks to your design, follow these steps: 1. Open your design software and go to the document settings. 2. Increase the document size by the desired bleed value on all sides (usually 0. 125 inches or 3mm).
How Do You Create A Bleed In Photoshop?
To create a bleed in Photoshop: 1. Open your design file in Photoshop. 2. Go to the “Image” menu and select “Canvas Size. ” 3. In the dialog box, enter the desired bleed value in the “Width” and “Height” fields.
Conclusion
To summarize, learning how to make bleed and crop marks in Photoshop is an essential skill for any designer or printer. By understanding the concept of bleed and the importance of crop marks, you can ensure that your printed materials are of high quality and professional-looking.
Whether you are designing a brochure, business card, or any other printed item, applying bleed and crop marks correctly will prevent any unwanted white edges or cut-off elements. Photoshop offers several tools and techniques to achieve this, such as using the Canvas Size dialog box, the Crop tool, or the Pen tool.
Remember to set up your document with the correct bleed measurements and export your final file in the appropriate format. By incorporating bleed and crop marks effectively, you can enhance the overall appearance and impact of your printed materials. Mastering this technique will undoubtedly elevate your design skills and make your work stand out in the competitive world of graphic design.